Installing Juniper Firefly Perimeter (vSRX) in VirtualBox and GNS3
November 11, 2014 39 Comments
Note: I have a followup post about doing the same thing but using Vagrant to create the initial VM instead of doing vmdk conversions for those having issues converting the vmdk.
=============================
The following instructions are how I was able to install a Juniper Firefly Perimeter (vSRX) into Virtual Box and then into GNS3 to test it. There are many similar articles out there that say similar instructions, this one at Radovan Brezula’s blog was the most helpful, but these are the steps I took and am recording them here for my safe keeping. The Firefly Perimeter, also called vSRX is a virtual firewall of Juniper’s SRX product line, which are security and firewall devices. My basic test is to try and set up a basic network where a PC on the inside(trusted zone) can ping out, but a PC on the outside(untrusted zone) can’t ping in.
Note: These instructions are run on my Windows 7 Desktop. If you are running any other OS, the instructions should be similar except for the path to the binaries.
1. Get OVA file from http://www.juniper.net/support/downloads/?p=firefly#sw
2. Extract contents of OVA file using 7-zip or other extracting tool. You should see something like the following.
certchain.pem
junos-vsrx-12.1X46-D25.7-domestic.cert
junos-vsrx-12.1X46-D25.7-domestic.mf
junos-vsrx-12.1X46-D25.7-domestic.ovf
junos-vsrx-12.1X46-D25.7-domestic-disk1.vmdk
3. Convert the vmdk virtual drive to vdi so it can be used by Virtual Box.
"c:\Program Files\Oracle\VirtualBox\VBoxManage.exe" clonehd -format VDI junos-vsrx-12.1X46-D25.7-domestic-disk1.vmdk junos-vsrx-12.1X46-D25.7-domestic-disk1.vdi
4. Create new VM in VirtualBox. These are the settings I used and work for me.
- General:
- Name: base-vSRX
- Type: Linux
- Version: Other Linux (32bit)
- System:
- Memory: 1024MB
- CPU: 2 (very important it is not 1 CPU)
- Enable PAE/NX
- Enable I/O APIC
- Hard Drive: IDE Primary master
- Use an existing virtual hard Drive file (Choose the junos-vsrx-12.1X46-D25.7-domestic-disk1.vdi you converted)
- Network: (You can choose if you want each interface to be NAT, BIND, LocalHost, etc.)
- Enable all 4 adapters and set the ‘Adapter Type’ to ‘Paravirtualized Network (virt-io net)’
- I’m going to set Adapter 1 to Host Only to test connectivity
- Audio:
- Off
- Serial Ports:
- Enable Serial Port 1
- Port Number: COM1
- Port Mode: Disconnected
5. Boot up the VM.
6. The default login is ‘root’ with no password.
7. Test connectivity
 Amnesiac (ttyd0)

login: root

--- JUNOS 12.1X46-D25.7 built 2014-09-06 01:40:34 UTC
 root@% ping -c 2 192.168.56.1
 PING 192.168.56.1 (192.168.56.1): 56 data bytes
 64 bytes from 192.168.56.1: icmp_seq=0 ttl=128 time=6.971 ms
 64 bytes from 192.168.56.1: icmp_seq=1 ttl=128 time=0.875 ms

--- 192.168.56.1 ping statistics ---
 2 packets transmitted, 2 packets received, 0% packet loss
 round-trip min/avg/max/stddev = 0.875/3.923/6.971/3.048 ms
This shows that I can ping from the vSRX to the Virtual Box host only device on the outside.
Now to do some more testing, I am going to use GNS3 and add the vSRX in.
1. Create a clone of the base-vSRX. I want to keep a clean base for cloning.
- Name: vSRX-1
- Check the ‘Reinitialize the MAC address of all network cards’.
- Linked Clone
2. Start GNS3
3. Add the vSRX-1 VM to the VirtualBox VM list in preferences.
Edit->Preferences->VirtualBox->VirtualBox VMs->New
4. Select the vSRX-1 VM from the list and click finish.
5. Choose the vSRX-1 in the VM list in the preferences and click on the Edit button
- General settings:
- Start VM in headless mode
- Network:
- Adapters: 4
- Start at: 0
- Type: ‘Paravirtualized Network (virt-io net)’
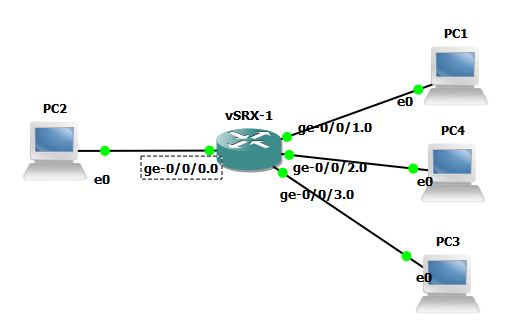
6. Add the vSRX-1 and four VPCS to the canvas.
vSRX e0(ge0/0/0.0) -> PC2 e0
vSRX e1(ge0/0/1.0) -> PC1 e0
vSRX e2(ge0/0/2.0) -> PC4 e0
vSRX e3(ge0/0/3.0) -> PC3 e0
7. Start the vSRX and connect to console.
8. Login and configure the interfaces. For this test, I am configuring ge-0/0/0 as the outside untrust interface(which is the config default) and the other three interfaces will be added to the trust zone.
 root@%
 root@% cli
 root> edit
 Entering configuration mode

[edit]
 root# set system host-name vSRX-1
 root# set interfaces ge-0/0/0 unit 0 family inet address 192.168.1.1/24
 root# set interfaces ge-0/0/1 unit 0 family inet address 192.168.2.1/24
 root# set interfaces ge-0/0/2 unit 0
 root# set interfaces ge-0/0/3 unit 0
 root# set system services web-management http interface ge-0/0/1.0
 root# set security zones security-zone trust host-inbound-traffic system-services http
 root# set security zones security-zone trust host-inbound-traffic system-services https
 root# set security zones security-zone trust host-inbound-traffic system-services ping
 root# set security zones security-zone trust host-inbound-traffic system-services ssh
 root# set security zones security-zone trust interfaces ge-0/0/1.0
 root# set security zones security-zone trust interfaces ge-0/0/2.0
 root# set security zones security-zone trust interfaces ge-0/0/3.0
9. Add a new local user and set root password
 root# set system login user admin class super-user
 root# set system login user admin authentication plain-text-password
 root# set system root-authentication plain-text-password
10. Commit config
root# commit
11. Configure two VPCS using their consoles
 PC1> ip 192.168.2.2 192.168.2.1 24
 PC2> ip 192.168.1.2 192.168.1.1 24
12. Test that PC1 can get out but PC2 can’t get in.
#PC1 on trust zone pinging out to PC2
PC1> ping 192.168.1.2
192.168.1.2 icmp_seq=1 ttl=63 time=0.500 ms
192.168.1.2 icmp_seq=2 ttl=63 time=0.500 ms

#PC2 on untrust zone pinging in to PC1
PC2> ping 192.168.2.2
192.168.2.2 icmp_seq=1 timeout
192.168.2.2 icmp_seq=2 timeout
So my basic network works for this basic test. So when you use the vSRX in your testing, remember that this is not just a plain router. This is a security firewall. So if you are just hooking it up as a router and can’t figure out why nothing works, remember that there are trust and untrust zones. Check which zone your interface is in.
One note. I tried to configure the other two port for switching and create a SVI using the following configuration.
vSRX-1:
 set vlans vlan-trust vlan-id 3
 set vlans vlan-trust l3-interface vlan.0
 set interfaces vlan unit 0 family inet address 192.168.3.1/24
 set interfaces interface-range interfaces-trust member ge-0/0/2
 set interfaces interface-range interfaces-trust member ge-0/0/3
 set interfaces interface-range interfaces-trust unit 0 family ethernet-switching vlan members vlan-trust
 set security zones security-zone trust interfaces vlan.0
VPCS:
PC4> ip 192.168.3.2 192.168.3.1 24
PC3> ip 192.168.3.3 192.168.3.1 24
But I found out after, that the vSRX(Firefly Perimeter) platform does not yet support Ethernet switching.
Anyway, I had fun trying this out and will keep playing with it. Enjoy.
This post ‘Installing Juniper Firefly (vSRX) in VirtualBox’ first appeared on https://techandtrains.com/.
