All In One OpenStack Icehouse on CentOS 6.6 in VirtualBox

With so much great virtualization out there, I obviously had to take a look at OpenStack and see how it works and what interesting network things you can do with it. There are tons and tons of blog posts about installing OpenStack. But as with other posts, these are the steps that I used and I want them saved somewhere for safe keeping. I had lots of options for choosing a platform, but I ended up using CentOS since it is closer to other enterprise operating systems like RHEL and Oracle Linux.

I’m going to start simple and just try an All In One installation. The following instructions are for installing an all in one OpenStack Icehouse on CentOS 6.6 in VirtualBox. For CentOS, I started with the CentOS 6.6 Minimal DVD to keep the footprint small.

First step is to create the VM and install CentOS.
CPU: 4
RAM: 2048
HD: 50G preallocate

For my VM, I bridged the VM to my host adapter. My public VM IP is 192.160.10.161

Next, let’s make sure all our packages are up to date.

yum update -y
reboot

Add OpenStack Icehouse specific repo to yum

yum install -y http://rdo.fedorapeople.org/openstack-icehouse/rdo-release-icehouse.rpm

Install packages to get ready

yum install -y epel-release
yum install -y openstack-packstack wget screen

Modify packstack file to allow install on CentOS
Edit /usr/lib/python2.6/site-packages/packstack/plugins/serverprep_001.py

if config['HOST_DETAILS'][host]['os'] in ('Fedora', 'Unknown'):

TO

if config['HOST_DETAILS'][host]['os'] in ('Fedora', 'CentOS', 'Unknown'):

Install OpenStack using packstack. I’m not trying anything fancy yet, so I won’t install Swift of Ceilometer. This part can take a long time to run. So go grab a coffee or two or three.

packstack --install-hosts=127.0.0.1 --use-epel=n --provision-demo=n --os-swift-install=n --os-ceilometer-install=n

Become admin user

source ./keystonerc_admin

Let’s add an image to Glance

mkdir /tmp/images
wget -P /tmp/images http://cdn.download.cirros-cloud.net/0.3.3/cirros-0.3.3-x86_64-disk.img
glance image-create --name "cirros-0.3.3-x86_64" --file /tmp/images/cirros-0.3.3-x86_64-disk.img \
--disk-format qcow2 --container-format bare --is-public True --progress

Create a smaller flavor size since we are running on limited memory

nova flavor-create --is-public true m1.micro 6 256 2 1

Set VNC proxy to be from my VM IP address so I can open the console from my host PC.

openstack-config --set /etc/nova/nova.conf DEFAULT novncproxy_base_url http://192.168.10.161:6080/vnc_auto.html

Configure Nova to use Qemu instead of KVM since we are running inside a VM.

openstack-config --set /etc/nova/nova.conf libvirt virt_type qemu
openstack-config --set /etc/nova/nova.conf DEFAULT compute_driver libvirt.LibvirtDriver
setsebool -P virt_use_execmem on
ln -s /usr/libexec/qemu-kvm /usr/bin/qemu-system-x86_64
service libvirtd restart
service openstack-nova-compute restart

All done.  Now go create some Networks and Instances.

From this point, I just followed the exercises I found on the following page for creating networks and instances.
http://www.oracle.com/technetwork/systems/hands-on-labs/hol-openstack-linux-ovm-2399741.html

My next post coming up soon will be about how I got a mutlinode OpenStack running using VirtualBox.

This post ‘All In One OpenStack Icehouse on CentOS 6.6 in VirtualBox’ first appeared on https://techandtrains.com/.
Using Vagrant to Install Juniper Firefly Perimeter (vSRX) in VirtualBox and GNS3

In a previous post, I showed how to create a Virtual Box VM of a Juniper Firefly Perimeter.  It worked great, but some steps where quite difficult for some users and there seemed to be many that had issues with getting interfaces to appear and connect.  Also, converting VM disk images was a pain.  Fortunately, I found another extremely simple way to create the VM in only a few steps, and that was Vagrant.  I had not used Vagrant before today, so it was a bit of a learning curve about what this tool does, but turned out to be very simple for what I needed it for.  After installing Vagrant it was as simple as two Vagrant commands and I had my VM up and running.

Many of the steps below were taken from my previous post with a few minor modifications and the replacement of the VM creation steps.

Note: These instructions are run on this system.

1. Create a directory to store the vagrant files.

md "d:\VirtualBox VMs\vagrant\boxes\juniper.ffp-12.1X47-D15.4"
cd "d:\VirtualBox VMs\vagrant\boxes\juniper.ffp-12.1X47-D15.4"

2. Create the Juniper Firefly Perimeter VM

vagrant init juniper/ffp-12.1X47-D15.4
vagrant up

Once it finishes downloading, booting and configuring, it will print out the details on how you can SSH to the vSRX.  Try it out by logging in as root with default password Juniper.  Be patient, the configuration might take a minute to connect to the VM.

3. Turn off the vSRX VM.

root@% cli
root> request system power-off

4. If you look in Virtual Box now, you will see a new VM with a really long strange name.  This is your new vSRX VM.  First thing is to rename the VM to something more recognizable like juniper.ffp-12.1X47-D15.4.

Now to do some more testing, I am going to use GNS3 and add the vSRX in.

1. Start GNS3

2. Add the vSRX VM to the VirtualBox VM list in preferences.
Edit->Preferences->VirtualBox->VirtualBox VMs->New

3. Select the juniper.ffp-12.1X47-D15.4  VM from the list and click finish.

4. Choose the juniper.ffp-12.1X47-D15.4 in the VM list in the preferences and click on the Edit button

  • General settings:
    • Start VM in headless mode
  • Network:
    • Adapters: 4
    • Start at: 0
    • Type: ‘Paravirtualized Network (virt-io net)’

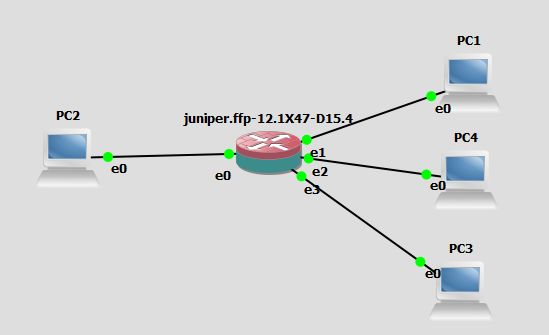
5. Add the juniper.ffp-12.1X47-D15.4 and four VPCS to the canvas.
vSRX e0(ge0/0/0.0) -> PC2 e0
vSRX e1(ge0/0/1.0) -> PC1 e0
vSRX e2(ge0/0/2.0) -> PC4 e0
vSRX e3(ge0/0/3.0) -> PC3 e0

vsrx-vagrant

6. Start the vSRX and connect to console.

7. Login and configure the interfaces. For this test, I am configuring ge-0/0/0 as the outside untrust interface(which is the config default) and the other three interfaces will be added to the trust zone.

 root@%
 root@% cli
 root> edit
 Entering configuration mode

[edit]
 root# delete interfaces ge-0/0/0 unit 0 family inet dhcp
 root# set interfaces ge-0/0/0 unit 0 family inet address 192.168.1.1/24
 root# set interfaces ge-0/0/1 unit 0 family inet address 192.168.2.1/24
 root# set interfaces ge-0/0/2 unit 0
 root# set interfaces ge-0/0/3 unit 0
 root# set system services web-management http interface ge-0/0/1.0
 root# set security zones security-zone trust host-inbound-traffic system-services http
 root# set security zones security-zone trust host-inbound-traffic system-services https
 root# set security zones security-zone trust host-inbound-traffic system-services ping
 root# set security zones security-zone trust host-inbound-traffic system-services ssh
 root# set security zones security-zone trust interfaces ge-0/0/1.0
 root# set security zones security-zone trust interfaces ge-0/0/2.0
 root# set security zones security-zone trust interfaces ge-0/0/3.0

9. Commit config

 root# commit

10. Configure two VPCS using their consoles

 PC1> ip 192.168.2.2 192.168.2.1 24
 PC2> ip 192.168.1.2 192.168.1.1 24

11. Test that PC1 can get out but PC2 can’t get in.

#PC1 on trust zone pinging out to PC2
PC1> ping 192.168.1.2
192.168.1.2 icmp_seq=1 ttl=63 time=0.500 ms
192.168.1.2 icmp_seq=2 ttl=63 time=0.500 ms

#PC2 on untrust zone pinging in to PC1
PC2> ping 192.168.2.2
192.168.2.2 icmp_seq=1 timeout
192.168.2.2 icmp_seq=2 timeout

So that is it for this alternative to creating a Juniper Firefly Perimeter (vSRX).  Hope this way is a lot less troublesome than the previous method of converting VM images.

This post ‘Installing Juniper Firefly (vSRX) in VirtualBox using Vagrant’ first appeared on https://techandtrains.com/.

Installing Arista vEOS in VirtualBox and GNS3

Something that I have been looking for, for a while, has been a nice software switch that I can use that support not just switching but VLANs as well. Yes, there is Open vSwitch, but I was looking for something more traditional, if that’s the right way to say it. I heard about Arista’s vEOS switch a while back, but back then you could only download it if you were already an Arista customer. But recently I ran across another great blog post at Radovan Brezula’s blog again that shows how to setup Arista’s vEOS and that’s when I found out that I could download vEOS to try without being an already Arista customer. I swear, this guy likes playing with virtual networking as much as I do.

So below I’ll walk through my steps for setting up vEOS in VirtualBox and then putting it into GNS3 to do some basic VLAN tests.

1. Download vEOS from https://www.arista.com/en/support/software-download . You will need to create an account.
Aboot-veos-serial-2.1.0.iso
vEOS-4.14.2F.vmdk

2. Create a base vEOS VM in VirtualBox

  • General:
    • Name: base-vEOS
    • Type: Linux
    • Version: Other Linux (64bit)
  • System:
    • Memory: 1024MB
    • CPU: 1
  • Hard Drive:
    • IDE Controller
      • HD: Use downloaded vmdk
      • CD: Use downloaded iso
  • Network:
    • Enable all 4 adapters and set the ‘Adapter Type’ to ‘PCNet-FAST III’
  • Audio:
    • Off
  • Serial Ports:
    • Enable Serial Port 1
    • Port Number: COM1
    • Port Mode: Disconnected

3. Boot it up.
The boot is a little slow to start the first time. Just wait a minute or so. When it finishes and you have the Login: prompt and you can login with ‘admin’ with no password.

Now that we have vEOS able to boot up into VirtualBox, lets add it into GNS3 for testing,

4. Make two vEOS VMs for use in GNS3

  • Make sure the base-vEOS is shutdown and remove the Aboot-veos-serial-2.1.0.iso from the CD. I had issues cloning while the CD was still attached.
  • My test is going to use two switches, so I cloned(linked clone) base-vEOS two times. vEOS-1 and vEOS-2.
  • Add Aboot-veos-serial-2.1.0.iso back in to each cloned VM.

5. Add to GNS3
Add both new vEOS clones to GNS3 VirtualBox list following
GNS3->Edit->Preferences->VirtualBox->VirtualBox VMs->New

6. After adding both VMs, choose the each VM one at a time in the VM list in the preferences and click on the Edit button to set the following.

  • General settings:
    • Start VM in headless mode
  • Network:
    • Adapters: 4 (Adapter0 will be used for the Management1 interface. So when you set the number of adapter you need, add one extra.)
    • Start at: 0
    • Type: ‘PCNet-FAST III’

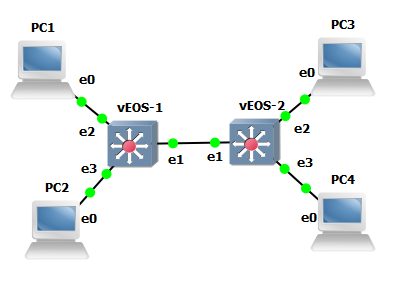
7. Add both switches to the GNS3 canvas along with four VPCS.
Create links between them
PC1 — vEOS-1 e2
PC2 — vEOS-1 e3
PC3 — vEOS-2 e2
PC4 — vEOS-2 e3
vEOS-2 e1 — vEOS-1 e1

vEOS-GNS3

8. Startup and configure

Now start up all the VPCS and vEOS switches.  After they start up, configure the switches to have a trunk between them and set the interfaces to the VPCS to be access.  To test VLANs, I’ll put PC1 and PC3 in one VLAN and I’ll put PC2 and PC4 in another.
vEOS-1:

hostname vEOS-1
enable secret arista
username admin secret arista
!
vlan 10
exit
vlan 20
exit
!
interface Ethernet1
switchport mode trunk
switchport trunk allowed vlan 10,20
no shutdown
exit
!
interface Ethernet2
switchport mode access
switchport access vlan 10
no shutdown
exit
!
interface Ethernet3
switchport mode access
switchport access vlan 20
no shutdown
exit

vEOS-2:

hostname vEOS-2
enable secret arista
username admin secret arista
!
vlan 10
exit
vlan 20
exit
!
interface Ethernet1
switchport mode trunk
switchport trunk allowed vlan 10,20
no shutdown
exit
!
interface Ethernet2
switchport mode access
switchport access vlan 10
no shutdown
exit
!
interface Ethernet3
switchport mode access
switchport access vlan 20
no shutdown
exit

PC1:

ip 192.168.1.2 /24

PC3:

ip 192.168.1.3 /24

PC2:

ip 192.168.2.2 /24

PC4:

ip 192.168.2.3 /24

9. Test it out
PC1 ping PC3

PC1> ping 192.168.1.3
192.168.1.3 icmp_seq=1 ttl=64 time=59.008 ms
192.168.1.3 icmp_seq=2 ttl=64 time=26.003 ms
192.168.1.3 icmp_seq=3 ttl=64 time=28.504 ms
192.168.1.3 icmp_seq=4 ttl=64 time=27.003 ms
192.168.1.3 icmp_seq=5 ttl=64 time=26.504 ms

PC2 ping PC4

PC2> ping 192.168.2.3
192.168.2.3 icmp_seq=1 ttl=64 time=26.004 ms
192.168.2.3 icmp_seq=2 ttl=64 time=26.503 ms
192.168.2.3 icmp_seq=3 ttl=64 time=26.004 ms
192.168.2.3 icmp_seq=4 ttl=64 time=26.003 ms
192.168.2.3 icmp_seq=5 ttl=64 time=25.503 ms

Well, it works great and does what I need it to do for a special test I want to try out, which I hope to post within the next month.

Enjoy everyone and thanks again to Radovan Brezula.

This post ‘Installing Arista vEOS in VirtualBox and GNS3’ first appeared on https://techandtrains.com/.